How to Weave In Ends on a Crochet Mesh Bandana

Beginner goal: Secure the starting and finishing tails without closing the open mesh.
n
What You Need
- Worsted-weight yarn
- 3.5 mm crochet hook
- Scissors and yarn needle
- Optional stitch marker and measuring tape
n
Stitches Used (US Terms)
n
Before You Begin
This bandana starts at the bottom point and grows upward into a triangle. The open mesh is made with ch-5 spaces. Work with relaxed, even tension; the chain spaces should stay open rather than tight.
n
Step 1 – Foundation
- Make a slip knot and place it on the hook.
- Ch 9.
- Work 1 dc into the first chain you made. This forms the small starting loop at the bottom point.
n
Step 2 – Row 1
- Ch 8 and turn the work.
- Work 1 sc into the first open space.
- Ch 5.
- On the opposite side edge, count up to the 3rd chain and work 1 dc there.
Check: after Row 1 you should see 2 open spaces across the top.
n
Step 3 – Row 2
- Ch 8 and turn.
- Sc in the first space.
- Ch 5, sc in the next space.
- Ch 5.
- Finish with 1 dc in the 3rd chain up on the side edge.
Check: after Row 2 you should have 3 top openings.
n
Step 4 – Continue the Triangle
For every new body row: Ch 8, turn, sc in the first space, then repeat [ch 5, sc in next space] across. Ch 5 and finish with 1 dc in the 3rd chain up on the side edge. Every completed row adds one new opening.
Easy count rule: after body Row N, the widest edge has N + 1 openings.
n
Step 5 – Choose the Size
Continue the body rows until the widest edge gives the head coverage you want. There is no single centimetre measurement because yarn and tension change the finished size. Hold the widest edge against the head periodically instead of relying only on row count.
n
Step 6 – First Tie
- Do not fasten off after the final body row.
- Ch 40.
- Starting in the 2nd chain from the hook, sl st in every chain back toward the bandana.
- You will work 39 sl sts on the return.
n
Step 7 – Picot and Side Border
Picot: Ch 3, then sl st into the base of the first chain of that ch-3.
Down the first angled side, alternate these treatments by side space: [1 sc, picot, 1 sc], then [2 sc]. Repeat toward the point. In the final point space work [1 sc, picot, 1 sc].
n
Step 8 – Second Side and Tie
Turn around the point and repeat the same alternating border up the second angled side. At the opposite top corner, ch 40 and sl st back from the 2nd chain from the hook for 39 sl sts.
n
Step 9 – Top Edge
Work 3 sc in every top opening. If you stopped after Row N, you have N + 1 openings, so the top-edge count is 3 x (N + 1) sc. Join with a sl st, ch 1 and fasten off.
n
Step 10 – Finish
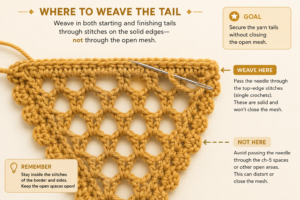
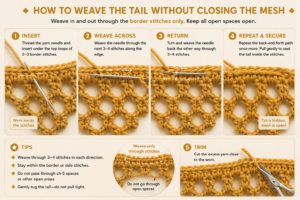
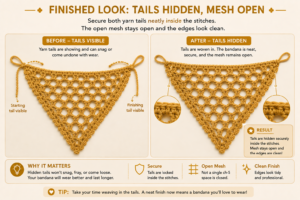
Weave in both yarn tails with a yarn needle. Lightly block the bandana if appropriate for the yarn fiber, keeping the ties relaxed and the triangle symmetrical.
n
Beginner Checks
- If the triangle cups, your chain spaces may be too tight.
- If one side grows faster, recheck the first sc and ending dc placement.
- If the opening count is wrong, go back to the first row where the count changed.
- Do not pull the slip stitches on the ties too tight.
n Enter your email to unlock the printable professional mesh bandana pattern.Get the Free Crochet Bandana PDF